What’s a Post?
At its core, WordPress is designed around blogging – the ability for its users to create posts about topics they care about, allow others to comment on those posts, and to even monetize the site with ads or member-only posts. But a post doesn’t have to be a blog – posts can be any information you want to share with your audience. Think of Facebook, or LinkedIn; there are no rules or constraints around posting.
Why Should I Post Regularly?
Making regular posts on your site helps keep your current audience engaged, and also helps you bring in new visitors. The more useful content you have, the more you are likely to get free advertising for your business in the form of appearing in search engine results – this is part of a core tenet known as SEO (Search Engine Optimization). But in a nutshell, as a business owner or hobbyist if you post something of interest related to the topics you have expertise in at least weekly, you will begin to see gains in the traffic to your website.
How to Create a Post
I’m assuming readers don’t have a lot of experience, if any, with WordPress. At a minimum, you will need to have the right permissions to create posts on your WordPress site. Don’t have a WordPress site yet? I can help out with that.
Login to the Admin Portal
Every WordPress set has what’s called the admin portal – which is where you log in to manage your site, and to make posts. It’s your base website URL plus wp-admin on the end of it. Using my site as an example – https://www.managednerds.tech – the admin portal is at https://www.managednerds.tech/wp-admin. Using your own site address, add wp-admin to the end of it, and then log in with your credentials.
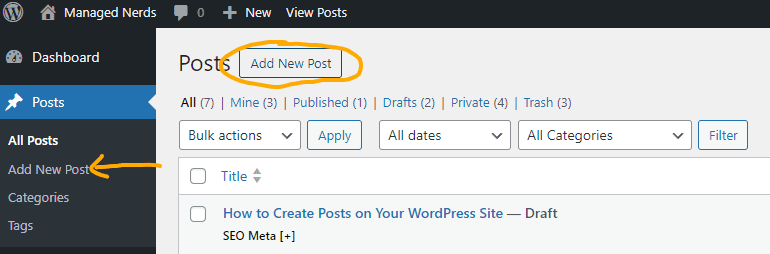
Go to the Posts Area and Add a New Post
Once you’re logged into your WordPress site, you’ll be using the Posts section to create a new post. There will be a menu on your left, look for “Posts”. Once you expand the menu you can directly click on “Add New Post” to start a new post, or click on “All Posts” and use the “New Post” button on that page to create a post.
Add your Content
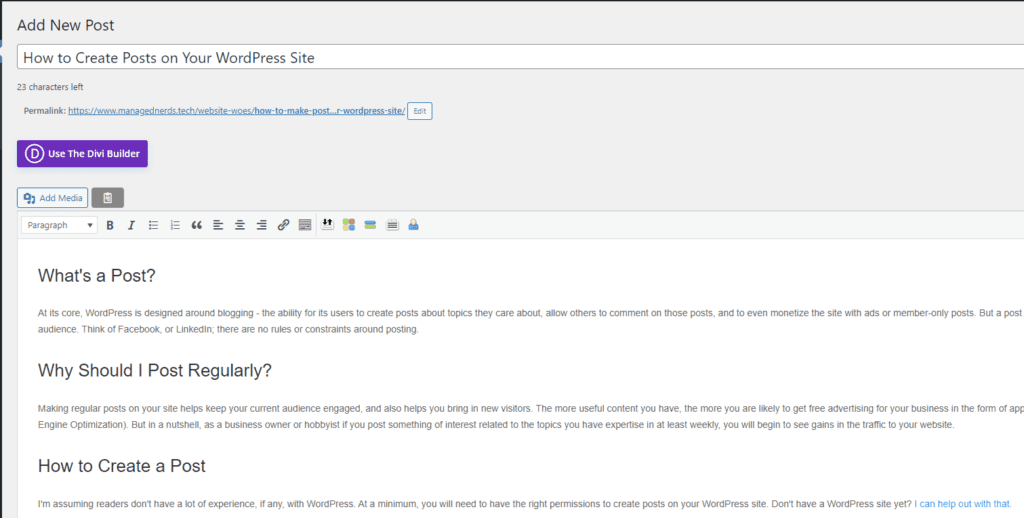
From there, it’s a matter of populating your post content. No matter the editor you use, you’ll be able to add text and images just like you’re using a document editor (ex: Microsoft Word). WordPress is designed to make it as easy as possible for you to post, even if you don’t understand how to build a website from scratch. In my case, I’m using the default Gutenberg editor for my posts – which feels the most like a basic document editor. You can see from my screenshot, I could also use the Divi builder.
Write an Excerpt
Your excerpt is used to provide a quick summary of your post. It allows you to take fine-grained control over what’s shown in the search engine results summary, and sometimes as well what’s shown in the summary when you cross-post it on social sites. Don’t skip creating your excerpt – this is what will help drive more traffic to your site. If you don’t create one, Google and Bing will try to guess what your article is about and create a summary that may or may not make sense. The excerpt section is just below the area you use to type in your post content.

Set a Featured Image
Your featured image is often used as the preview image when your post is shared on social media. Depending on your WordPress theme, it can also be displayed along with the post name and information in a list of your posts. You want to set a featured image as it helps draw your reader’s attention, and also helps them understand what your post might be about before they even read your excerpt. The featured image section is a little bit hard to spot, so it’s easy to forget to add one. Look on the right side of your screen and scroll down until you see it. Click “Set featured image” to add the image you want to use.
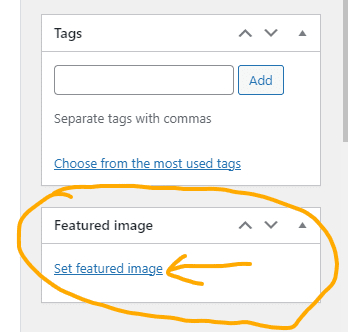
You can add an image that you have already used in your blog post, or a different image entirely. If you don’t have one in your media library, you can even upload one from your computer.

Select Your Category
WordPress posts are organized by category. Categories are helpful for telling your readers what your post is really about. I have some custom options set up so even my categories help drive visitors to my website – I’ll probably cover how to set it up for better SEO in a follow-on post and when I do, I’ll update this post to link to it. What you need to know here is you should not use Uncategorized. Select a category or add a new category if all you have is Uncategorized. I prefer to only set one category, but if you do want to set multiple categories for a post you can, just make sure to set one as a primary so that your post URL uses that category if category is part of your default URL slug.

Publish Your Post
Once you’ve taken the above steps, take one more check over your grammar and spelling. If your editor offers the preview option, previewing your post is always a good idea. The preview option is in the same area as the publish button. It will be in the top right area of your screen when you are editing your post.
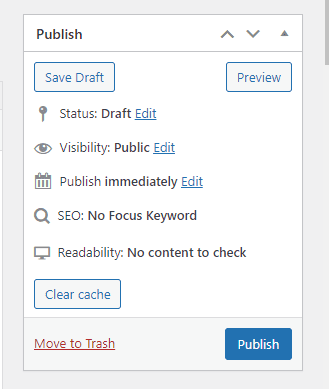
Your post is a draft until you hit publish. You can choose to change the visibility of your post prior to publish if you’ve got your site setup to require login and subscription to access your posts. You can also just save the draft for later and come back to it.
Share on Social Media
I’m assuming here that you don’t just have a WordPress site – you probably have LinkedIn, Facebook, X, and other social media. If you have it, use it. The more places your post is shared, the more traffic will be driven to your website. Once your post is published, a permalink will be available you can use to share your post. You can simply copy it from the post itself. In some cases, you might have your WordPress site set up to have social media share buttons on the posts themselves, which makes sharing even easier for you and your readers. This is another topic I’ll likely cover in a separate post and update this post to link to.
Final Thoughts
Hopefully I’ve helped you get started on your WordPress posting journey. If you need assistance getting your WordPress site configured to make posting easier, feel free to contact me and I’ll be glad to help out.
0 Comments